
How To Use Magnetic (Cat Eye) Gel Polish
If you've ever seen that mesmerizing shimmer that shifts and moves across a nail like a feline glare, that’s the cat eye effect. It's not just pretty; it's pure magic. But if you've tried using magnetic gel and ended up with a streaky mess or a barely-there glow, don’t worry, we’ve been there, hovering the magnet over my freshly painted nail, wondering, Is this thing even working?
Mastering cat eye gel polish takes a bit of technique, the right tools, and a whole lot of patience (okay, maybe just a little patience if you follow the steps below). This post will walk you through exactly how to use cat eye gel polish, from picking your base color to how long to hover the magnet to get that beautiful finish.
What Is Cat Eye Gel Polish?
At its core, cat eye gel polish is just like your regular gel nail polish, but with a twist: it contains magnetic particles that react to a magnet. When held at the right angle, the magnet pulls those particles into a concentrated line or curve that mimics, you guessed it….a cat’s eye.
Some call it the cat-eye effect, others just stare at it and go, "Ooooh." Either way, it’s become a staple in modern nail art.
What You Need to Get Started
Before diving in, make sure you’ve got:
-
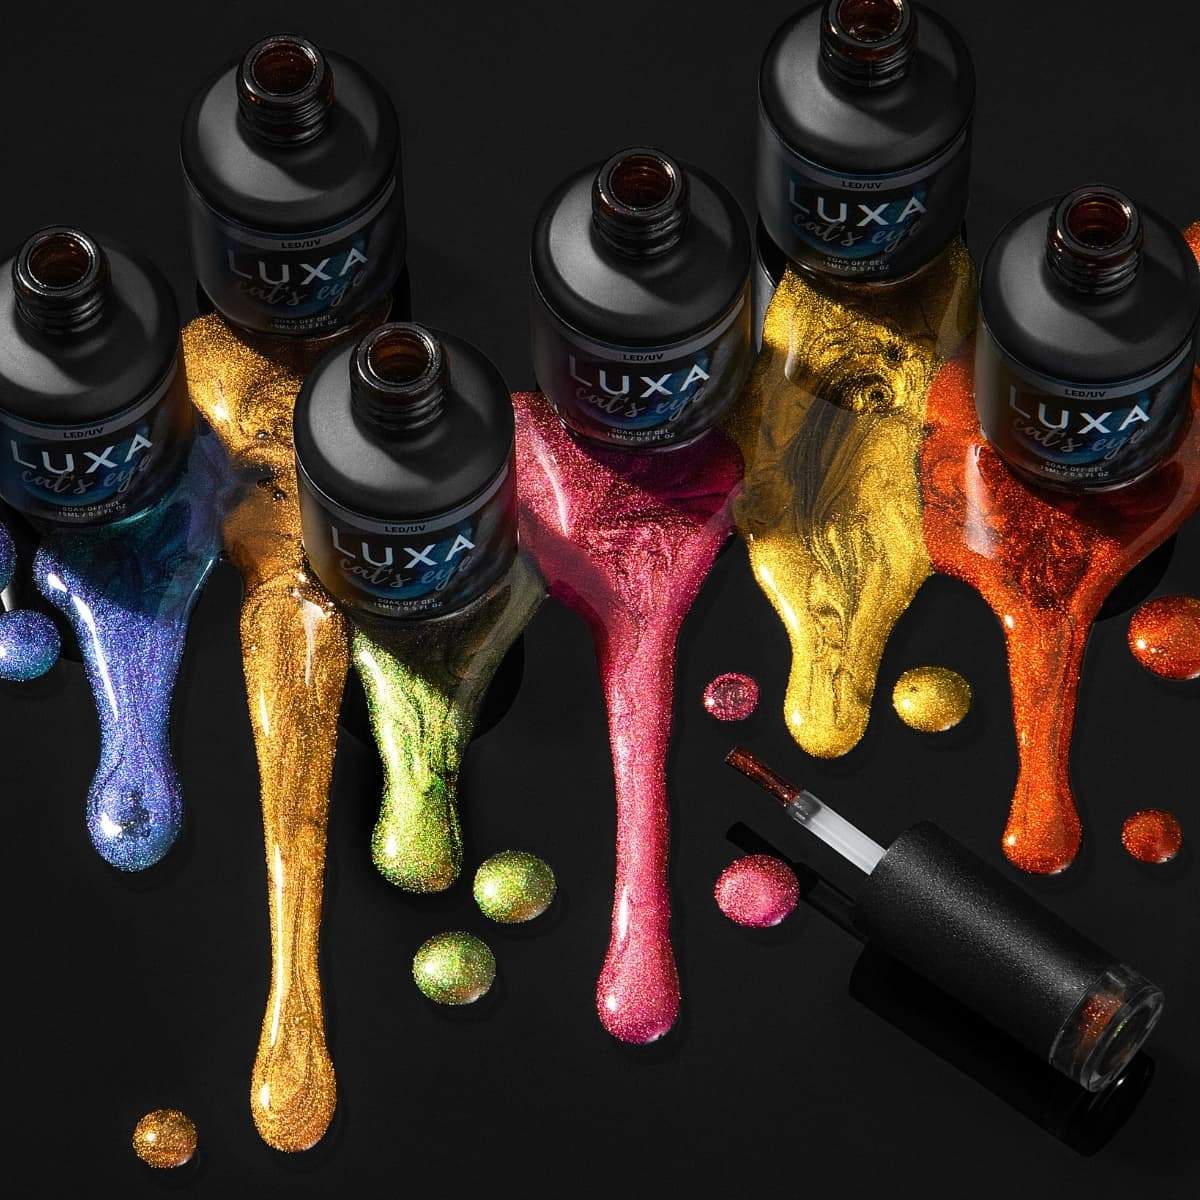
A magnetic gel polish (Luxa’s Cat Eye Collection is a great choice; these are highly pigmented and super responsive)
-
A strong nail magnet (some come dual-ended for different effects)
-
A base coat, top coat, and your favorite colored base (optional, depending on your cat eye gel)
-
A UV lamp or an LED lamp
-
A smooth application brush
Let’s break down the application.
Step-by-Step: How to Do Cat Eye Nails
1. Start with a Clean Base
First things first, prep those nails. File, shape, and push back your cuticles. Then wipe down with alcohol or cleanser to remove oils. This helps the gel polish stick and ensures a long-lasting manicure.
Apply a thin base coat and cure it under your UV lamp according to instructions. This step matters, don’t skip it, or you’ll end up with peeling or lifting.
2. Apply the Base Color (Optional)
If you're going for depth or contrast, you can start with a base color before the cat eye gel. Black is a classic choice because it makes the magnetic glitter pop, but you can experiment. Think deep plum, navy, or a sheer glitter layer for extra dimension.
Once applied, cure it fully.
3. Apply One Thin Coat of Cat Eye Gel
Now it’s time to apply the cat eye gel. Keep it thin and even; too much product and the magnet won’t reach the magnetic particles deep in the gel.
Don’t cure this layer just yet.
4. Use the Magnet to Create Your Effect
Hold the magnet close to the nail (about 2–5 mm) and hover it for 5–10 seconds.
-
If you want a sharp cat-eye line, hold the magnet vertically.
-
For a diagonal swoosh or wave, tilt it at an angle.
-
Move the magnet slowly across the nail before curing for a fade or texture.
You’ll literally see the magnetic particles shift and form into your desired design. Once you’re happy, lock it in with a cure.
Tip: Don’t touch or shake the nail before curing; the pattern will dissolve, and you’ll need to redo it.
5. Add a Second Coat (Optional)
You can repeat with another layer of cat eye gel polish to intensify the effect or layer in more color. Just remember to cure after each layer.
If you do this, you may want to magnetize each coat and cure it separately. This adds depth, like a galaxy trapped in your gel nail.
6. Finish With a Top Coat
Once you’re satisfied with the cat-eye look, seal it in with a high-gloss top coat. Cure it one last time. Then, wipe off the uncured tacky layer if needed, and you’re done.
Pro Tips for Better Results
-
Keep it thin: A thick coat makes the magnet less effective.
-
Use the magnet quickly: Don’t wait too long after applying the gel, or the particles may settle.
-
Stabilize your hand: Rest your pinky on the table or your other hand to reduce shaking when using the magnet to create your design.
-
Experiment with angles: You’ll be surprised how different placements give you unique looks.
-
Don’t overcure: Stick to recommended times; over-curing can dull the cat eye effect.
What Makes Luxa’s Cat Eye Collection So Good?
The reason to stick with Luxa is the formula. It’s smooth, super pigmented, and responds to the magnet effortlessly. Some brands require three layers to get coverage, but Luxa nails it in one.
Plus, the Cat Eye Collection features a mix of sheer tones, rich colors, and magnetic glitter finishes, making it easy to create a beautiful look without fuss.
And the best part is, you can layer Luxa cat eye gel polish over regular gel polish to mix up the vibe or keep things fresh week after week.
Final Thoughts
If you're still feeling unsure about how to use cat eye nail polish, don’t stress. Like most things in nail art, it takes a little practice. It may look more like a sleepy smudge the first time you try it. But with the proper steps and magnetic gel, you’ll turn heads with every turn of your fingers.
So pick your favorite from the Luxa Cat Eye Collection, and start experimenting. You might surprise yourself.


